Connecting Your 3D Printer to the Cloud - Raspberry Pi + Wifi (BETA)
Connect your 3D printer to the cloud with Raspberry Pi WiFi Beta. Revolutionize your printing experience!

Since opening our doors just over one month ago, our users have been anxious to connect their printers to 3DPrinterOS via wifi using their Raspberry Pi devices. We are pleased announce the release of our first beta version of our Raspberry Pi image that supports wifi connections to your 3D printer! Here is a quick walkthrough on how to get connected and printing easier than ever before via Raspberry Pi using a wifi dongle.STEP 1: Download the latest Raspberry Pi image by clicking the link below:RASPBERRY PI IMAGE DOWNLOADSTEP 2: Burn the Raspberry Pi image to SD card by following the instructions in the link below:How to install 3DPrinterOS on Raspberry Pi Type B/B+/2 image on 8gb cardSTEP 3: Plug in your Wifi Module into your Raspberry Pi and plug your Raspberry Pi to your 3D Printer via USB.[caption id="attachment_1130" align="aligncenter" width="640"]

We are using the Edimax EW-7811Un Wifi USB Adapter and you can find it on Amazon.com for under $10.[/caption]STEP 4: After plugging in your Wifi Module and turning on your Raspberry Pi go back to your computer and after 5 minutes or so you should see a new WiFi Network pop-up labeled “3dprinteros”. Click to connect to this network.
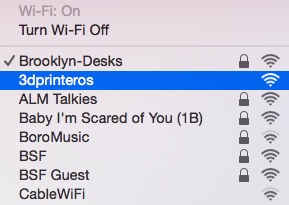
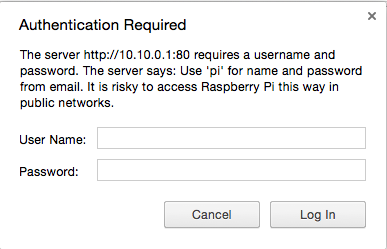
Step 5: Navigate to http://10.10.0.1. A dialog box will pop up saying “Authentication Required” Here you will enter:
User Name: piPassword: 3dprinteros-client
Step 6: Now you will see a prompt asking you to login using your 3DPrinterOS user name and password. Hit enter and wait for your account to be synced with your Raspberry Pi. (This could take a few minutes)

Step 7: You should now see your 3DPrinterOS client screen indicating that your printer in connected to the Raspberry Pi via 3DPrinterOS.

Step 8: Now that you have completed connecting your printer to 3DPrinterOS via Raspberry Pi Wifi, you can navigate to http://10.10.0.1/wifi where you will be prompted to enter your wifi password so that the pi will stay connected to the nextwork. After you complete this step you can disconnect your computer from the "3dprinteros" wifi network and back onto your home or office wifi network.Please be aware that this is a beta version of the 3DPrinterOS Pi image. Any feedback you can provide to us via the forum or via email at charles@3dprinteros.com is greatly appreciated.Thanks and Happy Printing!


Learn more about 3DPrinterOS - the most trusted 3D printing management software for Higher Education, Enterprises and OEMs. Fill out this form to get in touch with our experts.

Manage the workflow and permissions for your users

Share files and 3D printers to groups of users

Control your 3D printer fleet through a browser

Cloud slicer and toolpath viewer
Book your personalized assessment now and get your free trial.


